Camera"
m (→recording) |
|||
| Line 27: | Line 27: | ||
= recording = | = recording = | ||
| − | setRecording(true) is the same as invoking start() or resume(), depending on camera state. | + | setRecording(true) is the same as invoking start() or resume(), depending on camera's current state. |
setRecording(false) is the same as invoking stop(), if you want to pause recording, please invoke pause(). | setRecording(false) is the same as invoking stop(), if you want to pause recording, please invoke pause(). | ||
Revision as of 03:00, 27 August 2018
Camera
[ ZK EE ]
[ since 8.6.0 ]
Employment/Purpose
The Camera component is used to record videos and take snapshots in the browser. Developers can control the camera by start, stop, pause, resume and snapshot. The Camera component is based on Navigator.getUserMedia() and MediaRecorder, please check browser compatibility before using it.
Note: due to Chrome's security policy, starting from Chrome 47, getUserMedia() requests are only allowed from secure origins: HTTPS or localhost.
Example
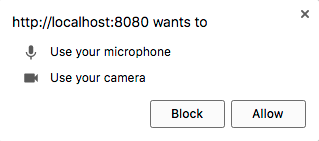
To record or take a snapshot, users should first enable their camera and microphone (as shown below.) If users reject the requests, they cannot use the features of the Camera component.
Note that some browsers such as Google Chrome will only accept webcam and microphone access from a trusted (https) source.
The Camera component also provides a method requestCamera() to request user's media devices before starting recording or taking snapshots.
  <camera id="camera" />
  <button onClick="camera.requestCamera()" />
recording
setRecording(true) is the same as invoking start() or resume(), depending on camera's current state.
setRecording(false) is the same as invoking stop(), if you want to pause recording, please invoke pause().
isRecording() can check whether the camera is recording or not.
  <camera id="camera" />
  <button onClick="camera.setRecording(true)" />
audio
You can decide whether to record audio while recording the video by specifying the value of audio; the valid value is boolean.
Default: true
<camera audio="false" />previewRecord
The Camera component provides a preview screen to preview the recorded content.
When you turn on the preview screen, you can set the screen size by specifying width and height in 'px'.
If you wish to take a snapshot, you must turn on the preview screen first, or nothing will happen.
Default: true
<camera width="600px" previewRecord="true" />maxsize
You can set the maximum size for uploading recorded video and snapshot. The unit is "KB". Negative value means unlimited, e,g,. maxsize="-1."
When the size of the recorded video or snapshot is bigger than the configured max size, nothing will be uploaded and it will trigger an event. To handle this situation, you can listen to onMaxsizeExceed and get the upload size from event.getData().
Default: please refer to max-upload-size
<camera maxsize="1024" onMaxsizeExceed="event.getData()" />lengthLimit
You can set the maximum recording length in "seconds".
When the recorded time exceeds the max length, it will stop recording and trigger an event. To handle this situation, you can listen to onLengthLimitExceed.
Default: 60
<camera lengthLimit="120" onLengthLimitExceed="doSomething()" />Customize recording hint
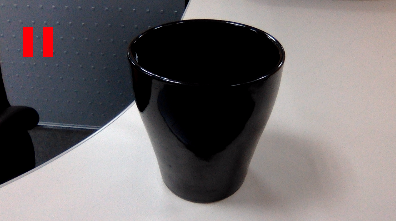
There are three classes that you can customize your recording hint, z-camera-recording, z-camera-stop and z-camera-pause.
Inspect DOM on the browser and you will see a html tag <i> before <video>; they are both in the same container <div>, these class names will apply to tag <i> depending on different state of camera.
For example:
If you want to notify users when the camera is pause, you can write css code like the following:
    <style>
	.z-camera-pause {
		width: 30px;
		height: 30px;
		top: 30px;
		left: 30px;
		position: absolute;
		border-left: 10px solid red;
		border-right: 10px solid red;
	}
    </style>
UploadEvent
There are two types of UploadEvent to listen to data upload: one is onVideoUpload and the other is onSnapshotUpload. Both ways can receive uploaded data by calling event.getMedia().
onVideoUpload will be notified after calling stop(), or when the recorded time exceeds the maximum length.
onSnapshotUpload will be notified after calling snapshot().
You can easily integrate the Camera component with Video and Image.
For example:
To integrate those components, you can write codes as shown below; after the video or snapshot is uploaded, you can see the result immediately.
  <camera onVideoUpload='video.setContent(event.getMedia())'
          onSnapshotUpload='image.setContent(event.getMedia())' />
  <video id="video" />
  <image id="image" />
StateChangeEvent
When you call start(), stop(), pause() or resume(), the Camera component will trigger StateChangeEvent. You can check the current state by calling event.getState(). The Camera component has four states, and you can access them by using Camera.START, Camera.STOP, Camera.PAUSE and Camera.RESUME.
For example:
If you want to do something after the recording starts, you can write codes as shown below (MVVM style).
<camera onStateChange="@command('stateChange', event=event)" /> @Command
public void stateChange(@BindingParam("event") StateChangeEvent event) {
if (event.getState() == Camera.START) {
// do something...
}
}The Camera component also provides isRecording(), isPaused() and isStopped() methods to check camera state.
Supported Events
| Event: UploadEvent
Notifies after the video has been uploaded. | |
| Event: UploadEvent
Notifies after the snapshot has been uploaded. | |
| Event: Event
Notifies if the recorded size is bigger than the max size. | |
| Event: Event
Notifies if the recorded length exceeds the max length. | |
| Event: StateChangeEvent
Notifies when invoking start(), stop(), pause() or resume(). |
- Inherited Supported Events: XulElement
Supported Children
NONE


