Create and Run ZK Application with Maven Artifacts"
From Documentation
Jimmyshiau (talk | contribs) |
|||
| (19 intermediate revisions by 3 users not shown) | |||
| Line 1: | Line 1: | ||
| − | + | {{ZKInstallationGuidePageHeader}} | |
| − | |||
| − | =How to create Maven web project= | + | {{Deprecated |
| − | == Create Maven | + | |url=[[ZK Installation Guide/Quick Start/Create and Run Your First ZK Application with Eclipse and Maven]] |
| + | |}} | ||
| + | |||
| + | __TOC__ | ||
| + | |||
| + | |||
| + | If you are first to Maven, please refer to [[ZK Installation Guide/Setting up IDE/Maven/Create and Run ZK Application with Maven Archetype|Create and Run ZK Application with Maven Archetype]] because it is easy to follow. This article is more helpful for users who already have a Maven project and/or want to handle some of the configuration files manually. | ||
| + | |||
| + | =How to create ZK Maven web project= | ||
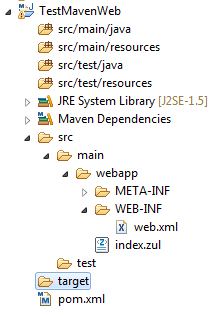
| + | [[File:MavenProject.png|frame|ZK Maven Project Hierarchy]] | ||
| + | == Create Project of Maven== | ||
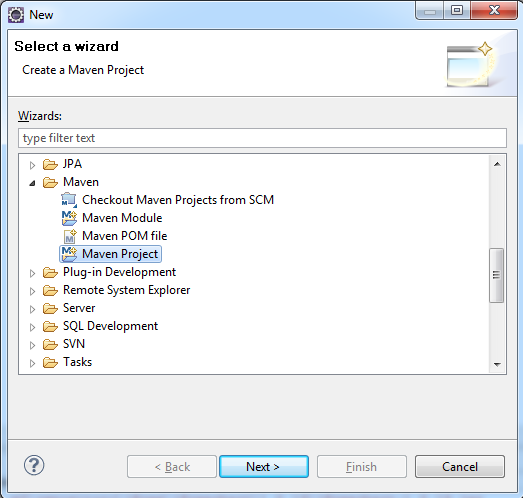
*'''[File]''' -> '''[New]''' -> '''[Other]''' --> '''[Maven Project]''' | *'''[File]''' -> '''[New]''' -> '''[Other]''' --> '''[Maven Project]''' | ||
*:[[File:ZK_Installation_Guide_Maven_step1.png]] | *:[[File:ZK_Installation_Guide_Maven_step1.png]] | ||
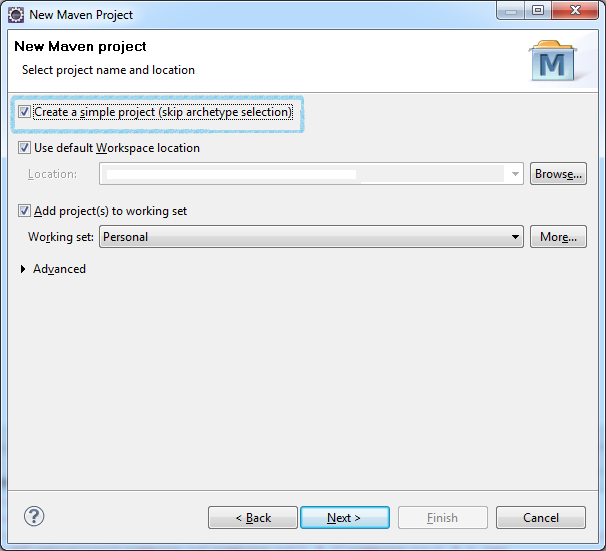
| Line 9: | Line 18: | ||
*:[[File:ZK_Installation_Guide_Maven_step2.png]] | *:[[File:ZK_Installation_Guide_Maven_step2.png]] | ||
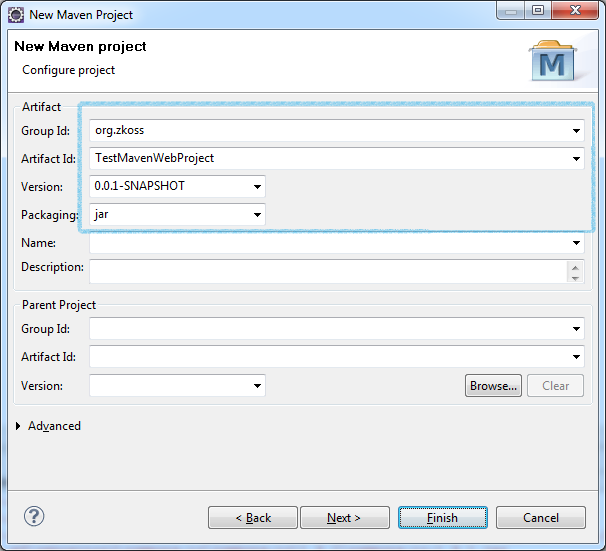
*Fill the first 4 field '''(you can change them later)''' --> Click '''[Finish]''' | *Fill the first 4 field '''(you can change them later)''' --> Click '''[Finish]''' | ||
| + | *:''Group Id'' is usually the package name but it could be anything you prefer. Here we use <tt>org.zkoss</tt>, but it is better to use your own. | ||
| + | *:''Arifact Id'' is your project's ID. | ||
| + | *:''Version'' is your project's version. | ||
*:[[File:ZK_Installation_Guide_Maven_step3.png]] | *:[[File:ZK_Installation_Guide_Maven_step3.png]] | ||
| − | == Add | + | |
| + | == Add WTP Support (Project Facet) == | ||
#Create new folder under '''/src/main/''' named webapp | #Create new folder under '''/src/main/''' named webapp | ||
#Right Click on your Maven Project -> Choose '''Properties''' -> Choose '''Project Facets''' -> Check '''Dynamic Web Module''' | #Right Click on your Maven Project -> Choose '''Properties''' -> Choose '''Project Facets''' -> Check '''Dynamic Web Module''' | ||
| − | + | #: Note: if it showing '''Covert facet from...''', simply click it to enable facet. | |
| − | + | #:[[File:ZK_Installation_Guide_Maven_web1.png]] | |
#Click '''Further configuration available'''' --> input the ''Context Root'' and ''Content Directory'' --> Check '''Generate web.xml deployment descriptor''' | #Click '''Further configuration available'''' --> input the ''Context Root'' and ''Content Directory'' --> Check '''Generate web.xml deployment descriptor''' | ||
| − | + | #:[[File:ZK_Installation_Guide_Maven_web2.png]] | |
| + | |||
| + | == Enable Dependency and Web Project configuration == | ||
| + | |||
| + | === web.xml === | ||
| + | *Overwrite the content of '''/src/main/webapp/WEB-INF/web.xml''' with [[ZK Installation Guide/ZK Background/Sample of web.xml | Sample of web.xml]]. | ||
| + | |||
| + | === pom.xml === | ||
| + | *Overwrite the content of '''pom.xml''' with [[ZK Installation Guide/Setting up IDE/Maven/Use ZK Maven Repository#Sample_of_pom.xml | Sample of pom.xml]] | ||
| − | == | + | =How to run Maven project on Run-Jetty-Run (Optional) = |
| + | Notice that [http://code.google.com/p/run-jetty-run/ Run-Jetty-Run] is optional. The speed of deployment is much faster, but the server is [http://jetty.codehaus.org/jetty/ Jetty] embedded in Run-Jetty-Run. If you prefer to use your own server, you could skip this step. | ||
| − | + | #Create new zul file '''index.zul''' <ref>[[ZK Installation Guide/Quick Start/Create and Run Your First ZK Application with Eclipse and ZK Studio#Create_a_new_ZUL_file]]</ref> under '''/src/main/webapp''' | |
| + | #Goto '''Run Configurations''' | ||
| + | #: [[File:ZK_Installation_Guide_maven_run1.png]] | ||
| + | #Double click on '''Jetty Webapp''' | ||
| + | #* It will auto fill '''Project''' / '''Port''' / '''Context''' / '''WebApp Dir ''' | ||
| + | #: [[File:ZK_Installation_Guide_maven_run2.png]] | ||
| + | #Click '''Run''' and browse http://127.0.0.1:8080/TestMavenWebProject/ | ||
| + | ---- | ||
| + | <references /> | ||
Latest revision as of 04:44, 22 June 2012
![]() This article is out of date, please refer to ZK Installation Guide/Quick Start/Create and Run Your First ZK Application with Eclipse and Maven for more up to date information.
This article is out of date, please refer to ZK Installation Guide/Quick Start/Create and Run Your First ZK Application with Eclipse and Maven for more up to date information.
If you are first to Maven, please refer to Create and Run ZK Application with Maven Archetype because it is easy to follow. This article is more helpful for users who already have a Maven project and/or want to handle some of the configuration files manually.
How to create ZK Maven web project
Create Project of Maven
- [File] -> [New] -> [Other] --> [Maven Project]
- Check Create a simple Project
- Fill the first 4 field (you can change them later) --> Click [Finish]
Add WTP Support (Project Facet)
- Create new folder under /src/main/ named webapp
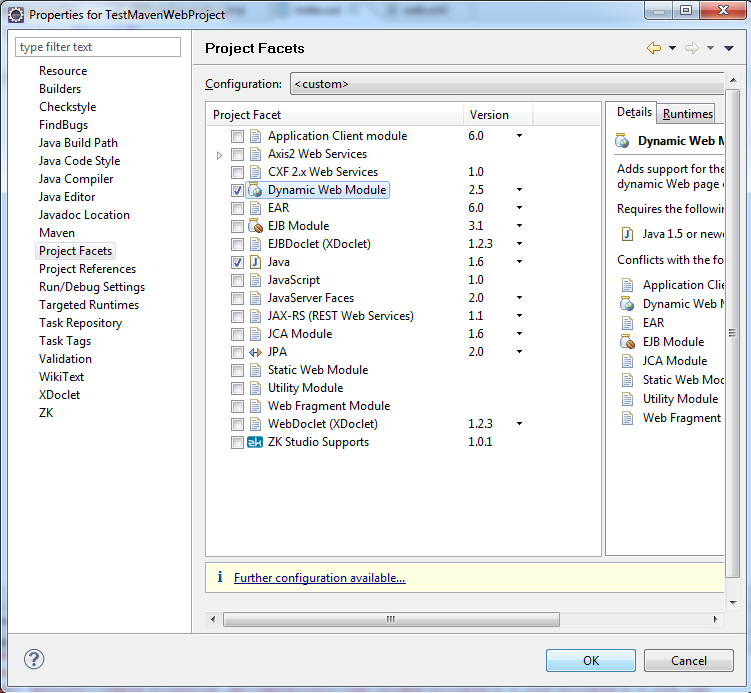
- Right Click on your Maven Project -> Choose Properties -> Choose Project Facets -> Check Dynamic Web Module
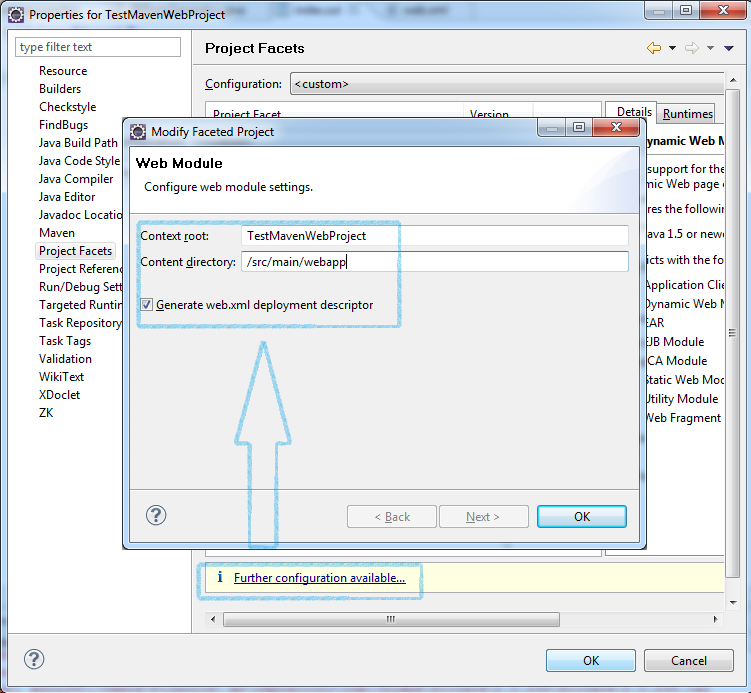
- Click Further configuration available' --> input the Context Root and Content Directory --> Check Generate web.xml deployment descriptor
Enable Dependency and Web Project configuration
web.xml
- Overwrite the content of /src/main/webapp/WEB-INF/web.xml with Sample of web.xml.
pom.xml
- Overwrite the content of pom.xml with Sample of pom.xml
How to run Maven project on Run-Jetty-Run (Optional)
Notice that Run-Jetty-Run is optional. The speed of deployment is much faster, but the server is Jetty embedded in Run-Jetty-Run. If you prefer to use your own server, you could skip this step.
- Create new zul file index.zul [1] under /src/main/webapp
- Goto Run Configurations
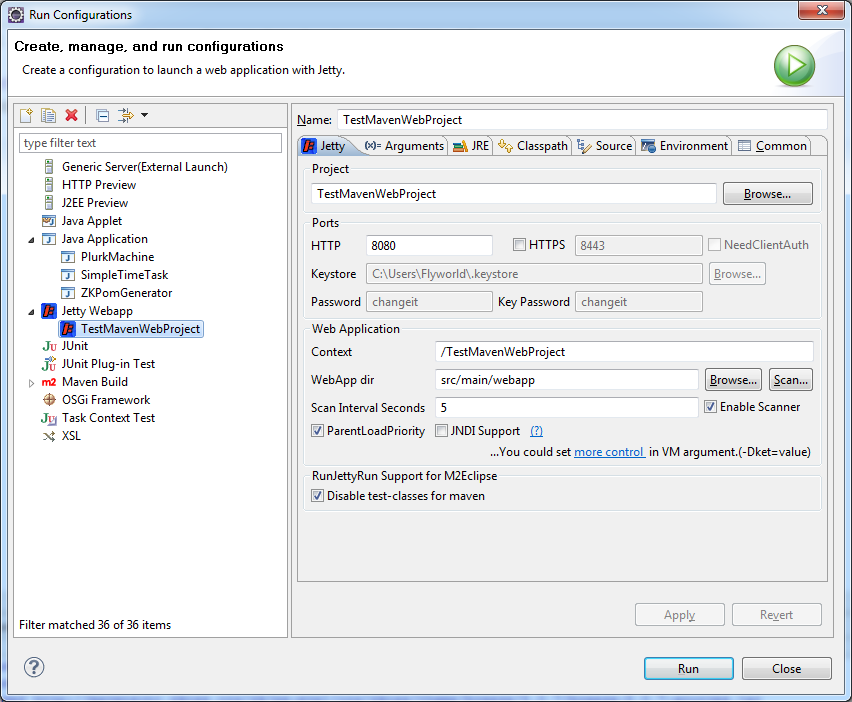
- Double click on Jetty Webapp
- It will auto fill Project / Port / Context / WebApp Dir
- Click Run and browse http://127.0.0.1:8080/TestMavenWebProject/
