Chapter 6: Implementing CRUD"
From Documentation
(→Read) |
(→Read) |
||
| Line 85: | Line 85: | ||
</source> | </source> | ||
* Line 8: The default value for required attribute <tt>name</tt> is "model". | * Line 8: The default value for required attribute <tt>name</tt> is "model". | ||
| − | * Line 9: | + | * Line 9: We can implement simple presentation logic with EL expression. Here we apply different styles according to a flag <tt>each.complete</tt>. |
| + | * Line 11: The <tt>each.complete</tt> is a boolean variable so that we can assign it to <tt>checked</tt>. By doing this, the checkbox will be checked if the to-do item's <tt>compelete</tt> variable is true. | ||
| + | * Line 14: | ||
== Update == | == Update == | ||
Revision as of 04:35, 23 January 2013
Target Application
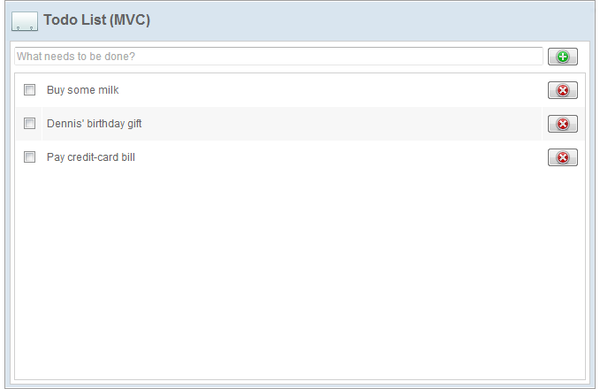
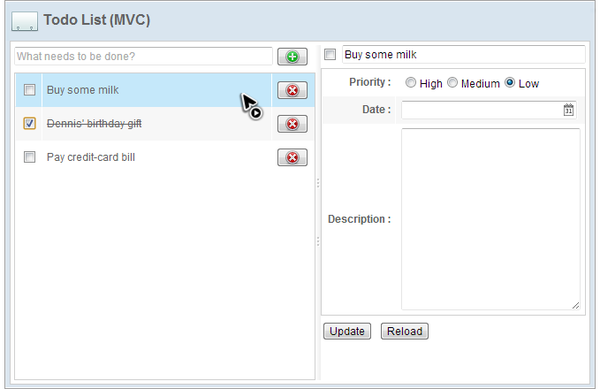
In this chapter, we are going to build an application with 4 basic operations, CRUD (Create, Read, Update, and Delete). The application's user interface looks like the images below:
Select an Item:
Select a Todo Item
It is a personal todo list management system and it has following features:
- Create a todo item.
- Type item name in upper-left textbox and click File:Tutorial-chi6-plus.png or press "Enter" key to create a new todo item.
- Finish a todo item.
- Click the checkbox in front of a todo item to mark it as finished and the item name will be decorated with line-through.
- Modify a todo item.
- Click an existing item and the detail editor appears. Then you can edit the item's details.
- Delete a todo item.
- Click File:Tutorial-chi6-cross.png to delete an existing todo item.
MVC Approach
If you have read previous chapters, constructing user interface for the example application should not be a big problem. Let's look at the layout first and ignore the details.
Layout in chapter6/todolist-mvc.zul
<?link rel="stylesheet" type="text/css" href="/style.css"?>
<window apply="org.zkoss.tutorial.chapter6.mvc.TodoListController"
	border="normal" hflex="1" vflex="1" contentStyle="overflow:auto">
	<caption src="/imgs/todo.png" sclass="fn-caption" label="Todo List (MVC)"/>
	<borderlayout>
		<center autoscroll="true" border="none">
			<vlayout hflex="1" vflex="1">
				<!-- todo creation function-->
				<!-- todo list -->
			</vlayout>
		</center>
		<east id="selectedTodoBlock" visible="false" width="300px" border="none" collapsible="false" splittable="true" minsize="300" autoscroll="true">
			<vlayout >
				<!-- detail editor -->
			</vlayout>
		</east>
	</borderlayout>
</window>
- Line 5: We construct the user interface with Border Layout to separate layout into 2 areas.
- Line 6: The center area contains a todo creation function and a todo list.
- Line 12: The east area is a todo item editor which is invisible if no item selected.
Read
As we talked in previous chapters, we can use Template to define how to display a data model list with implicit variable each.
Display a To-do List
...
	<listbox id="todoListbox" vflex="1">
		<listhead>
			<listheader width="30px" />
			<listheader/>
			<listheader hflex="min"/>
		</listhead>
		<template name="model">
			<listitem sclass="${each.complete?'complete-todo':''}" value="${each}">
				<listcell>
					<checkbox forward="onCheck=todoListbox.onTodoCheck" checked="${each.complete}"/>
				</listcell>
				<listcell>
					<label value="${each.subject}"/>
				</listcell>
				<listcell>
					<button forward="onClick=todoListbox.onTodoDelete" image="/imgs/cross.png" width="36px"/>
				</listcell>
			</listitem>
		</template>
	</listbox>
...
- Line 8: The default value for required attribute name is "model".
- Line 9: We can implement simple presentation logic with EL expression. Here we apply different styles according to a flag each.complete.
- Line 11: The each.complete is a boolean variable so that we can assign it to checked. By doing this, the checkbox will be checked if the to-do item's compelete variable is true.
- Line 14:

