Prepare Data"
| Line 81: | Line 81: | ||
<source lang="java"> | <source lang="java"> | ||
| − | // columns are | + | // columns are categorized by Airline, then Flight |
model.addColumnField("Airline"); | model.addColumnField("Airline"); | ||
model.addColumnField("Flight"); | model.addColumnField("Flight"); | ||
| − | // rows are | + | // rows are categorized by Agent, then Customer |
model.addRowField("Agent"); | model.addRowField("Agent"); | ||
model.addRowField("Customer"); | model.addRowField("Customer"); | ||
Revision as of 04:01, 30 March 2011
Pivottable takes a model for its data population. Analogous to ListModel for Grid component, the model interface we use for Pivottable is PivotModel.
However, unlike Grid or Listbox, due to the logic of pivot table, we cannot specify data as children components of a Pivottable, so you always need to prepare a PivotModel prior to using Pivottable.
Construct a PivotModel
TabularPivotModel is a standard implementation of PivotModel. It's constructor takes two List, for raw data and column labels.
public TabularPivotModel(List<? extends List<?>> data, List<String> columns) { ... }
Here is a simple example of constructing a TabularPivotModel.
	public static TabularPivotModel getModel() {
		return new TabularPivotModel(getData(), getColumns());
	}

	// raw data
	public static List<List<Object>> getData() {
		Object[][] objs = new Object[][] {
				{ "Carlene Valone", "Tameka Meserve",    "ATB Air", "AT15",  "Berlin",     "Paris",     186.6, 545  },
				{ "Antonio Mattos", "Sharon Roundy",     "Jasper",  "JS1",   "Frankfurt",  "Berlin",    139.5, 262  },
				{ "Russell Testa",  "Carl Whitmore",     "Epsilon", "EP2",   "Dublin",     "London",    108.0, 287  },
				{ "Antonio Mattos", "Velma Sutherland",  "Epsilon", "EP5",   "Berlin",     "London",    133.5, 578  },
				{ "Carlene Valone", "Cora Million",      "Jasper",  "JS30",  "Paris",      "Frankfurt", 175.4, 297  },
				{ "Richard Hung",   "Candace Marek",     "DTB Air", "BK201", "Manchester", "Paris",     168.5, 376  },
				{ "Antonio Mattos", "Albert Briseno",    "Fujito",  "FJ1",   "Berlin",     "Osaka",     886.9, 5486 },
				{ "Russell Testa",  "Louise Knutson",    "HST Air", "HT6",   "Prague",     "London",    240.6, 643  },
				{ "Antonio Mattos", "Jessica Lunsford",  "Jasper",  "JS9",   "Munich",     "Lisbon",    431.6, 1222 },
				// more rows...
				{ "Russell Testa",  "Velma Sutherland",  "Epsilon", "EP4",   "London",     "Berlin",    155.7, 578  }
		};

		List<List<Object>> list = new ArrayList<List<Object>>();
		for(Object[] a : objs)
			list.add(Arrays.asList(a));
		return list;
	}

	// column labels
	public static List<String> getColumns() {
		return Arrays.asList(new String[]{
				"Agent", "Customer", "Airline", "Flight", "Origin", "Destination", "Price", "Mileage"
		});
	}
Determine fields on rows and columns
In addition to providing data, you also need to specify how you want to categorize it. For example, given the previously constructed TabularPivotModel
// what to show on column headers (how you categorize the x-axis)
model.addColumnField("Airline");

// what to show on row headers (how you categorize the y-axis)
model.addRowField("Agent");

// which field to show in data cell
model.addDataField("Price");
This will result in a Pivottable that looks like
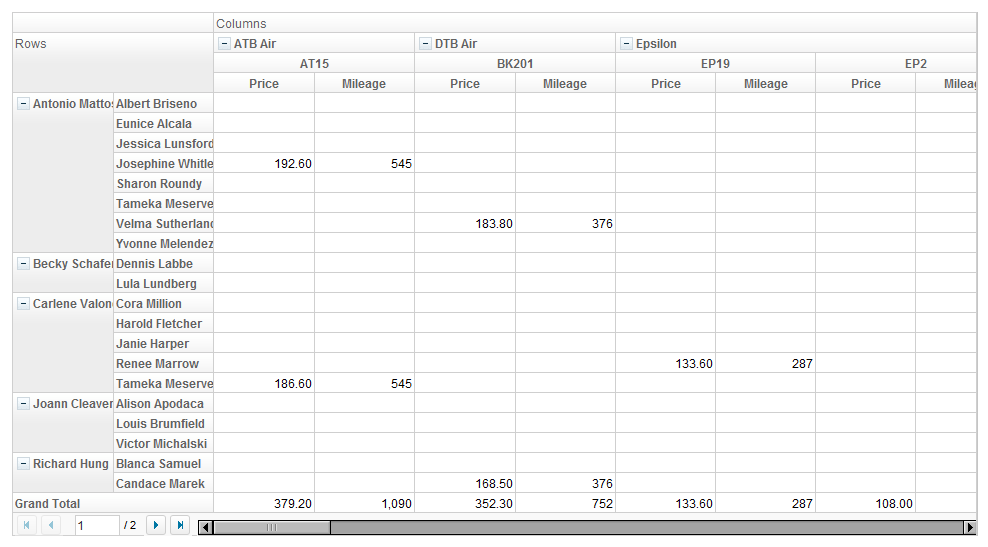
Of course, to utilize the power of Pivottable, you can specify multiple fields as column, row, and data fields.
// columns are categorized by Airline, then Flight
model.addColumnField("Airline");
model.addColumnField("Flight");

// rows are categorized by Agent, then Customer
model.addRowField("Agent");
model.addRowField("Customer");

// show sum of Price and Mileage in each cell, if any
model.addDataField("Price");
model.addDataField("Mileage");
Now the Pivottable shall look like
Hint: if you can't wait to play around with the component, you can jump to next section and come back to read further if necessary.
Summary
Subtotals
Grouping
Version History
| Version | Date | Content |
|---|---|---|

