Printing In ZK"
| Line 190: | Line 190: | ||
</source> | </source> | ||
| − | The resulting layout is demonstrated in [[ | + | The resulting layout is demonstrated in [[Small_Talks/2014/December/Printing_In_ZK#Result_Demo section 4.3 ]]. |
== Modify the Report Look and Feel == | == Modify the Report Look and Feel == | ||
Revision as of 09:10, 19 December 2014
Vincent Jian, Engineer, Potix Corporation
December 10, 2014
ZK 7.0.4
Introduction
The ability to print out a web page is a common business requirement especially if you are in the finance or banking industry where you may need to document some important data in papers. The most common approach is to design two views: one for online browsing and one for printing. However, it is a time consuming job to design two layouts to suit both purposes. This smalltalk will introduce an easy way to print out selected area of a ZK page, without having to design two views.
Print a ZK page
Thanks to the advancements of modern browsers, if you wish to print out the current view of a webpage, you can simply press "Ctrl + P" and the browser will print the current page for you.
Alternatively you can use the Clients.print() API provided by ZK.
Sample
It is easy to use theClients.print() API, here is the simplest sample:
<zk>
	<window title="Print Whole Page" border="normal">
		<button label="Print" onClick="Clients.print()" />
		<grid>
			<columns>
				<column label="Column 1" />
				<column label="Column 2" />
			</columns>
			<rows>
				<row forEach="1,2,3,4,5">
					<label value="First Name" />
					<label value="Last Name" />
				</row>
			</rows>
		</grid>
	</window>
</zk>
Print Selected Area
However, in many cases you do not care about the headers, footers or the sidebar and you wish to only print out the data you are interested in. Here under we will introduce how we could achieve this easily in ZK.
Concept
We first create a snapshot of the html fragment of the component you want to print. Then we post and insert this fragment into a template zul file, rendered in a hidden iframe.
One key point here is to use a hidden iframe -- it is common to use javascript function window.open() to open another browser tab or window and then pass the html content to the newly opened window to print. However, it is not a very user-friendly design because some browsers may block the pop-up window. Thus, here we implement the print utility by creating a hidden iframe to avoid opening another browser window.
Implementation Steps
First, we create a template.zul page with Html component to store the content we want to print.
<zk>
	<style src="${param.printStyle}" media="print" />
	<html content="${param.printContent}" />
</zk>
- Line 2: Used to load the print style.
- Line 3: Html component to print.
Second, we need to create a utility class PrintUtil.java to call javascript print function.
public class PrintUtil {
	public static void print(Component comp) {
		print(comp, "template.zul", null);
	}

	public static void print(Component comp, String cssuri) {
		print(comp, "template.zul", cssuri);
	}

	public static void print(Component comp, String uri, String cssuri) {
		String script = "zk.print('" + comp.getUuid() + "', '" + uri + "'";
		if (cssuri != null) {
			script += ", '" + cssuri + "');";
		} else {
			script += ");";
		}
		Clients.evalJavaScript(script);
	}
}
- Line 11: The javascript print function to call.
Third, create print.js file to define zk.print function and create a hidden iframe to avoid opening a new browser window.
zk.print = function(uuid, uri, cssuri) {
	if (uuid && uri) {
		var wgt = zk.Widget.$(uuid),
			body = document.body,
			ifr = jq('#zk_printframe');
		if (!ifr[0]) {
			jq(body).append('<iframe id="zk_printframe" name="zk_printframe"' +
				' style="width:0;height:0;border:0;position:fixed;"'+
				'></iframe>');
			ifr = jq('#zk_printframe');
		}
		// wait form submit response then call print function
		// reference: http://isometriks.com/jquery-ajax-form-submission-with-iframes
		ifr.unbind('load.ajaxsubmit').bind('load.ajaxsubmit', function() {
			var iw = ifr[0].contentWindow || ifr[0];
			iw.document.body.focus();
			iw.print();
		});

		jq(body).append('<form id="zk_printform" action="' + uri + '" method="post" target="zk_printframe"></form>');
		var form = jq('#zk_printform'),
			content = '<div style="width: ' + wgt.$n().offsetWidth + 'px">' + jq(wgt.$n())[0].outerHTML + '</div>';
		form.append(jq('<input/>').attr({name: 'printContent', value: content}));
		if (cssuri) {
			form.append(jq('<input/>').attr({name: 'printStyle', value: cssuri}));
		}
		form.submit().remove();
	} else {
		window.print();
	}
}
- Line 6: Create hidden iframe.
- Line 14: Execute window.print() function once iframe finishes loading.
- Line 20: Create a hidden form and set target to the hidden iframe.
- Line 27: Submit the form then remove.
Finally, we can modify the sample in previous section to print only the grid component we care.
<zk>
	<window title="Print Whole Page" border="normal">
		<button label="Print" onClick="org.zkoss.addon.print.PrintUtil.print(grid)" />
		<grid id="grid">
			<columns>
				<column label="Column 1" />
				<column label="Column 2" />
			</columns>
			<rows>
				<row forEach="1,2,3,4,5">
					<label value="First Name" />
					<label value="Last Name" />
				</row>
			</rows>
		</grid>
	</window>
</zk>
- Line 3, 4: Use printing utility to print grid component.
Advanced Usage
After going through the steps above we can easily implement an utility to print out only the desired components/data of a ZK page. Now, to go a step further, you may wish to add some extra elements to the desired data. For example you may wish to add your company letter head or company logo, or a signature field so that the printed page can be submitted for approval. Or, you may wish to tweak the font size or color to make the printed copy more readable. Here under we will use two examples to demonstrate how these could be done.
Modify the Template Page
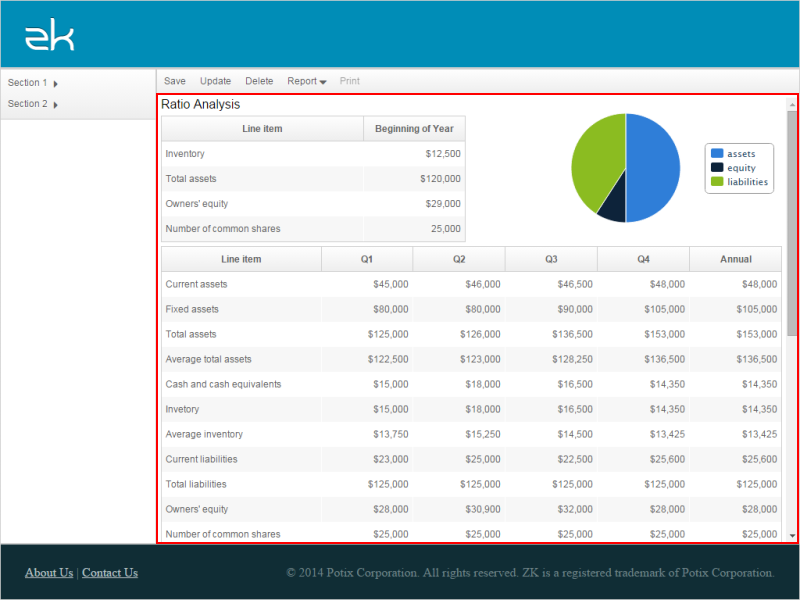
Take the following web page as the first example:
We wish to print only the center part highlighted in red, with extra information -- report header and footer.
In the previous section, the template.zul page is as simple as possible to demonstrate the concept and usage. By customizing this zul file we can easily add desired report header and footer or any elements we want to include in the printed view.
For example, below is the new template file content named newTemplate.zul where we have placed the logo, title and other desired fields.
<zk xmlns:n="native">
	<style src="${param.printStyle}" media="print" />
	<div sclass="printHeader">
		<n:div class="logo">
			Company Logo
		</n:div>
		<n:div class="title">
			Ratio Analysis
		</n:div>
		<n:div class="text">
			Report Date: 2014/12/31
		</n:div>
	</div>
	<html content="${param.printContent}" />
	<div sclass="printFooter">
		<n:div class="signature">
			Signature:
		</n:div>
	</div>
</zk>
- Line 3: Add custom report header with company logo, report title and report date.
- Line 15: Add custom report footer with signature.
Then use the print utility class as follows:
PrintUtil.print(comp, "print/newTemplate.zul", null);
The resulting layout is demonstrated in Small_Talks/2014/December/Printing_In_ZK#Result_Demo section 4.3 .
Modify the Report Look and Feel
It is also possible to modify the look and feel for the targeting content to make it more readable when being printed.
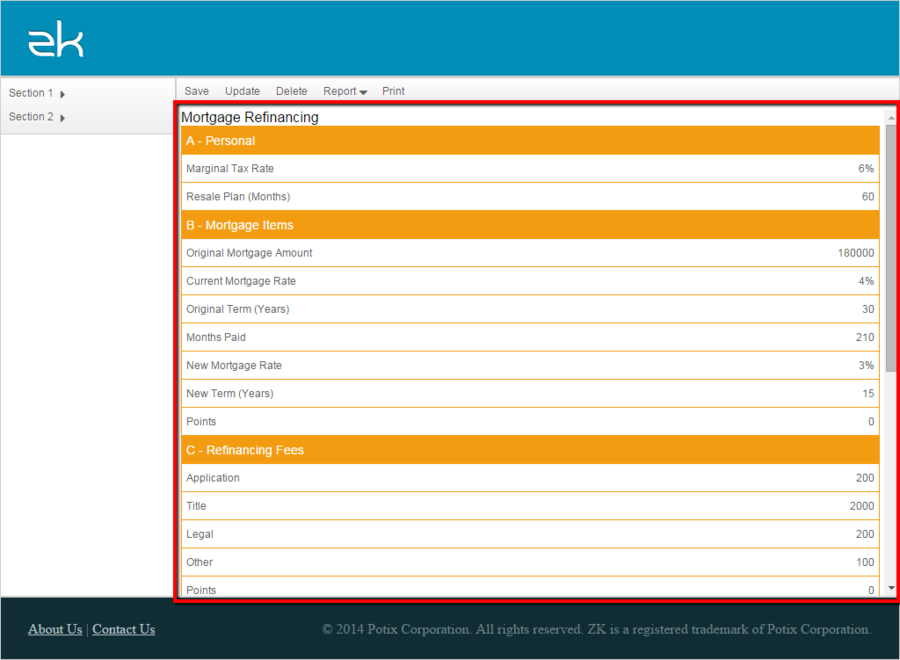
Take the following web page as an example :
It looks quite nice and clear in the browser but when being printed out, especially using a monochrome printer, some of the white and gray colored text might be hard to read. To make the text stand out better and make it more readable on the papers we may wish to enlarge the text and specify a proper text and background color. This can be done by providing a custom print style with the following steps.
First, we find out the CSS styles we use for the web page. For ease of demonstration I am only extracting some styles here:
.mortgage-category {
	font-family: Arial,Sans-serif;
	font-size: 14px;
	color: #FFFFFF;
	padding: 4px 5px 3px;
	line-height: 24px;
	background-color: #F39C12;
	border-bottom: 1px solid #F39C12;
}
.mortgage-item-cell {
	font-family: Arial,Sans-serif;
	font-size: 12px;
	color: #636363;
	padding: 4px 5px 3px;
	line-height: 24px;
	overflow: hidden;
	border-bottom: 1px solid #F39C12;
}
- Line 3, 4, 12, 13: the font size and color for viewing on website.
- Line 7, 8, 17: the used color for viewing on website.
Then, we copy the styles above to a new file called print.css as a basis, and modify as needed for printing.
.mortgage-category {
	font-family: Arial,Sans-serif;
	font-size: 18px;
	color: #000000;
	padding: 4px 5px 3px;
	line-height: 24px;
	background-color: #DDDDDD;
	border-bottom: 1px solid #DDDDDD;
}
.mortgage-item-cell {
	font-family: Arial,Sans-serif;
	font-size: 16px;
	color: #000000;
	padding: 4px 5px 3px;
	line-height: 24px;
	overflow: hidden;
	border-bottom: 1px solid #DDDDDD;
}
- Line 3, 4, 12, 13: the font size and color for printing.
- Line 7, 8, 17: the used color for printing.
Finally, we use the print utility as follows:
//use absolute path if zul page and css file are in different folders
PrintUtil.print(comp, "print/newTemplate.zul", "/css/print.css");
The resulting style is demonstrated in the 2nd half of the Demo video in section 4.3 below.
Result Demo
The video below demonstrates the results of the two advanced usages described above. For ease of demonstration here we use a PDF printer so the resulting screen is a PDF file, but you can definitely specify a real printer to print out the desired results on papers.
Summary
With the printing utility explained in the article, you can print the desired sections in a ZK page with only little effort -- you can even include custom headers & footers or change the style easily for better readability. For your convenience we have wrapped this utility as a ready-to-use jar file. Refer to download section to download the jar file and put it in your project's WEB-INF/lib folder.
Download
Comments
| Copyright © Potix Corporation. This article is licensed under GNU Free Documentation License. |

