Shining ZATS Mimic
Hawk Chen, Engineer, Potix Corporation
April, 2012
1.0.0-RC
Opening
In agile software development, developers modify their codes frequently for requirement change or refactoring, they therefore also perform unit tests frequently to ensure the software quality. In ZK-based applications, it is hard to execute an unit test on the composer which is tightly-coupled to ZUL because it is instantiated when a ZUL is requested by a browser. The same problem arises if you want to verify a ZUL's zkbind expression with ViewModel. Hence TDD (Test-Driven Development) cannot proceed under this situation.
In some cases, agile developers may deploy their web applications to a server and test it within a browser. However, writing an automation test to control a browser is an issue, and testing for different browsers is also a trouble. Not to mention that running an unit test in an application server is time-consuming and can be an agile developer's darkest moment. But, don't be depressed, let me enlighten your path with the first light of ZK Application Test Suite (ZATS) - Mimic Library.
This project is mostly inspired by Georgi Rahnev of Telesoft Consulting GmbH, Vienna, along with a few other users and contributors. Your feedback is very valuable to us and we appreciate very much.
Comparing to previous freshly release (please refer Small Talks/2012/April/The Dawn of ZK Application Test Suite:Mimic Library), we change initialized API and support more user operations. These makes this library apply to wider testing scenario.
Mimic Library : No Server Test
Mimic library enable testers to test their composer without an application server, and of course without a browser, either. Through this library, testers can mimic user interactions to applications such as clicking or typing to verify composer's (controller layer) data and logic. All they have to do is to write a regular unit test case and use mimic library's utility class to interact components on ZUL. Then, run the test case.
No deploying to server, no rendering on browser, the unit test case can be executed in a very short period of time - this is very helpful for frequent unit testing during agile development processes.
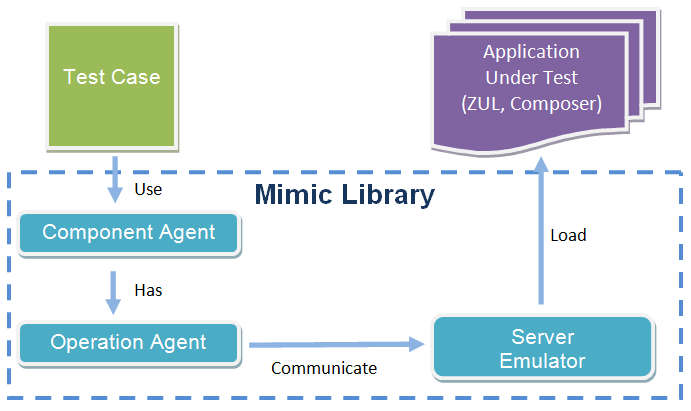
The concept is as follows:
Testers write test cases to simulate user action such as clicking or typing with operation agents. The operation agent communicates with server emulator and triggers the composer's event handlers to change the component's status. Testers can check component's properties from component agent to verify the result of user action. It might be a label changing its value or a Listbox increases by one item. These behaviors that reflect on the component's properties can be verified.
Limitation
As this library focuses on testing the composer's logic on the server side, there are some limitations you should know:
- Functions that depend on the application server cannot work.
- Test cases run in simulated environment; all functions that requires an application server does not work (e.g. JNDI, or JTA). If user's AUT (Application Under Test) project adopts such container-provided services, they need extra work to make it work normally out of a container, e.g. use Test Double like a fake object.
- Cannot test browser’s behavior.
- In ZK-based applications, some behaviors are handled by browser (JavaScript), e.g. popup menu or message dialog created at client side. As server side is not aware of these behaviors, we cannot verify it.
- Cannot test visual effects.
- It cannot verify any behaviors that doesn't reflect upon component's properties such as animations, or a component's visual effect.
Setup
Maven Project
It will be available in the near future!
Manually
Download the release zip file, add all jar under dist/lib and dist/lib/ext into your project's classpath.
Remember also add jar of your preferred unit test framework, e.g. JUnit.
Write a Test Case
The steps to write a test case are as follows:
- Setup web application content path
- Create a client to connect to a ZUL
- Query a component
- Perform an operation on a component
- Verify result by checking a component’s property
- Tear down, stop server emulator
Hello Mimic Test
To present the basic usage of mimic library, I will demonstrate how to test a simple application. This application has only one button and one label, after clicking it, the label will show "Hello Mimic".
Before diving into the source code of a test case, let me introduce some basic classes used in a test case.
- Zats
- It contains several utility methods to initialize and clean testing environment. By default it starts server emulator with predefined web.xml and zk.xml bundled in mimic library's jar.
- Client
- It acts like a client to the server emulator and we use it to connect to a ZUL.
- DesktopAgent
- It wraps ZK Desktop object, we usually call its query() or queryAll() to retrieve ZK components with selector syntax supported in SelectorComposer
- For available selector syntax, please refer to javadoc or Small Talks/2011/January/Envisage ZK 6: An Annotation Based Composer For MVC
- ComponentAgent
- It mimics a ZK component and determines which operation you can perform on it. We can also get ZK component property's value from it.
- It also has query() , it means to find targets among its child components.
- OperationAgent (ClickAgent, TypeAgent, SelectAgent...)
- To mimic a user operation to a ZK component.
- We name it "Agent" because it's not really the user operation itself. It's an agent to mimic user operation on a component.
Hello Test Case
We write the test case with JUnit 4 annotation, please refer to JUnit 4 in 60 seconds.
HelloTest.java"
//remove import for brevity
public class HelloTest {
	@BeforeClass
	public static void init() {
		Zats.init("./src/main/webapp");
	}

	@AfterClass
	public static void end() {
		Zats.end();
	}

	@After
	public void after() {
		Zats.cleanup();
	}

	@Test
	public void test() {
		DesktopAgent desktop = Zats.newClient().connect("/hello.zul");

		ComponentAgent button = desktop.query("button");
		ComponentAgent label = desktop.query("label");

		//button.as(ClickAgent.class).click();
		button.click();
		assertEquals("Hello Mimic", label.as(Label.class).getValue());
	}
}
- Before starting a test, we have to call Zats.init() and pass root directory where ZUL pages are stored as a parameter. Most of the times, it is located in your web application's content root folder. In our example, we use maven default project structure. This method initialize testing environment and starts the server emulator. (line 5)
- Of course, we start the server emulator at @BeforeClass , we should stop it by Zats.end() at @AfterClass . (line 10)
- We should call Zats.cleanup() to clear desktop before opening another ZUL. (line 15)
- The first statement of a test case is to create a client and connect to a ZUL page, like a browser visits a ZUL. The connect() returns a DesktopAgent and we usually retrieve ComponentAgent from it to perform user operation. (line 20)
- Before we can mimic a user action to a component, we should retrieve a ComponentAgent. Empowered by selector syntax, DesktopAgent .query() is a powerful tool to retrieve it. As the ZUL contains only one button, we can query it by component name: query("button") (line 22)
- As we don't have a browser screen to view, we cannot interact with a component by mouse's pointer. To mimic a user action, we have to convert ComponentAgent to one of the operation agents. The conversion method as() will check for available operation for the target ComponentAgent . For example, you cannot type something in a Label, If you try to convert it to a non-available operation agent, you will get an exception. (line 25)
- For convenience, ComponentAgent provides shortcut methods for commonly used operations like click() . It automatically converts for you. (line 26)
- To verify test result, we also can use ComponentAgent.as() to convert it as a ZK component then get its property by getter methods. (line 27)
Operation Agent Usage
In order to mimic user operation to ZK components, our library provide various operation agents. You can find all supported under package org.zkoss.zats.mimic.operation including check, click, close, focus, key stroke, select, multiple select, type, select by index, and render . We support those commonly-used operation first and will keep adding more operations.
ClickAgent
ClickAgent helps us to mimic clicking a component in general intention. It could trigger onClick, onDoubleClick, or onRightClick event. Because most of user action are done by clicking, but they might have different intentions. To click on a listitem means selecting it, and to click on a checkbox represents checking it. Therefore, to avoid mixing several actions into clicking operation, specific action has corresponding specific operation agent. For example, if you want to select a listitem, use SelectAgent . For checkbox, use CheckAgent . It depends on your intention.
According to ZK Component Referenece, all components that inherit HtmlBasedComponent support click, double click, and right click.
ClickTest.java
public class ClickTest {

	//remove other methods for brevity

	@Test
	public void test() {
		DesktopAgent desktop = Zats.newClient().connect("/click.zul");

		ComponentAgent label = desktop.query("#mylabel");
		ComponentAgent eventName = desktop.query("#eventName");

		label.click();
		assertEquals("onClick", eventName.as(Label.class).getValue());

		label.as(ClickAgent.class).doubleClick();
		assertEquals("onDoubleClick", eventName.as(Label.class).getValue());

		label.as(ClickAgent.class).rightClick();
		assertEquals("onRightClick", eventName.as(Label.class).getValue());
	}
}
- As we mentioned in previous section, it's a shortcut method for convenience. (line 12)
- If you want to perform double click or right click, you have get ClickAgent first from ComponentAgent . (line 15,18)
TypeAgent
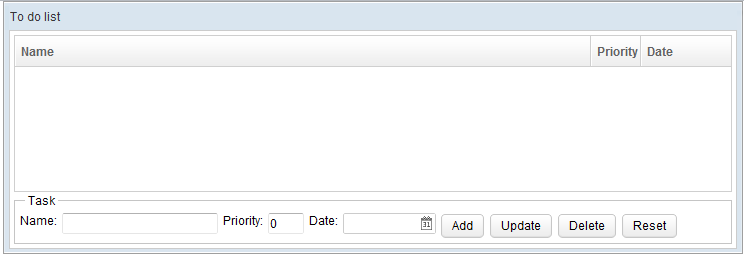
We use a todo list application to demonstrate TypeAgent usage . Here is the application's UI:
The following test case verifies "Add" function, we enter values into 3 field: item name, priority, and date, and click "Add" button. Then we inspect each listcell of a listitem to verify the result.
TodoTest.java
public class TodoTest {

	@Test
	public void test() {
		//visit the target page
		DesktopAgent desktop = Zats.newClient().connect("/todo.zul");

		//find components
		ComponentAgent itemName = desktop.query("textbox");
		ComponentAgent priority = desktop.query("intbox");
		ComponentAgent date = desktop.query("datebox");

		//add
		//itemName.as(TypeAgent.class).type("one-item");
		itemName.type("one-item");
		priority.type("3");
		date.type("2012-03-16");
		desktop.query("button[label='Add']").click();

		//verify each listcell's label
		ComponentAgent listbox = desktop.query("listbox");
		List<ComponentAgent> cells = listbox.queryAll("listitem").get(0).getChildren();
		assertEquals("one-item",cells.get(0).as(Listcell.class).getLabel());
		assertEquals("3",cells.get(1).as(Listcell.class).getLabel());
		assertEquals("2012/03/16",cells.get(2).as(Listcell.class).getLabel());
	}
}
- The formal usage of TypeAgent is to retrieve from a ComponentAgent . (line 14)
- As seen in the previous example, this is also a shortcut method. (line 15)
- Although priority is an intbox, we still provide a String as the parameter. The string will be parsed to an integer internally, if failed we'll get a exception. (line 16)
- When typing in a Datebox, use the date format that you have specified in Datebox's "format" attribute. The same rule applies to timebox. (line 17)
- The query syntax means "retrieve a button whose label is 'Add'". (line 18)
- If we call ComponentAgent.query() , it'll only query the ComponentAgent's child components. Here, we find listitem to get listcell. (line 22)
SelectAgent
We keep using todo list application to demonstrate SelectAgent usage. In this application, when selecting a listitem, its value will be loaded to three different input fields for modification. The following test case steps verify listitem's data is correctly loaded into 3 input fields.
To single select a listitem, we must to retrieve it first. The same rule applies to grid and combobox. We should retrieve a row or comboitem before selecting them.
TodoTest.java
public class TodoTest {
	@Test
	public void test() {
		//remove irrelevant code for brevity

		//update
		desktop.queryAll("listbox > listitem").get(0).as(SelectAgent.class).select();
		//verify selected
		assertEquals("one-item",itemName.as(Textbox.class).getValue());
		assertEquals((Integer)3,priority.as(Intbox.class).getValue());
		assertEquals("2012-03-16",date.as(Datebox.class).getRawText());
	}
- Retrieve a listitem and use SelectAgent to select it.
RenderAgent
When a listbox (or grid) uses a live data and is not in paging mold, it doesn't load all items at first time rendering. It just pre-loads first few items. Until a user scrolls the scroll bar forward, it loads and renders the subsequent items. If we retrieve those un-rendered listitems in a test case, we will find its listcell contains no child components. This is one of ZK optimization behavior: to avoid loading large amount data which might not be viewed by users.
Hence, before we retrieve components inside a listcell, we shoulde uses Render operation to force listbox loads its content.
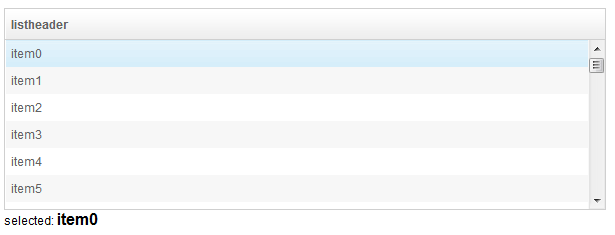
We use a simple case to demonstrate how to use this agent. This application contains a lisbox with 1000 listitems and it has simple logic: when a user selects an item, the label at the bottom will display the item's content. Each listcell has one child component label.
RenderTest.java
	@Test
	public void testRendererAgent() {
		DesktopAgent desktop = Zats.newClient().connect("/render.zul");

		ComponentAgent listbox = desktop.query("#listbox");
		Label itemData = desktop.query("#itemData").as(Label.class);

		//selecting first item works correctly
		listbox.getChild(1).as(SelectAgent.class).select();
		Assert.assertEquals("item0", itemData.getValue());

		//select a non-rendered item
		listbox.getChild(1000).as(SelectAgent.class).select();
		Assert.assertEquals("", itemData.getValue());
		//get a non-rendered listcell, check it has no child.
		Listcell listcell = listbox.getChild(1000).getChild(0).as(Listcell.class);
		Assert.assertTrue(listcell.getChildren().size()==0);

		listbox.as(RenderAgent.class).render(999, 999);

		listbox.getChild(1000).as(SelectAgent.class).select();
		Assert.assertTrue("item999".equals(itemData.getValue()));
		listcell = listbox.getChild(1000).getChild(0).as(Listcell.class);
		Assert.assertTrue(listcell.getChildren().size()>0);
	}
- Selecting first item, item data label displays correctly. (line 9,10)
- Before using RenderAgent to render, select last item doesn't make label display anything. (line 13,14)
- We can also find that listcell has no children. (line 16,17)
- render() could accept a range of item as parameters, and the index starts from 0. The last index of 1000 listitem is 999. But the last listitem's index of the listbox is 1000, index 0 is listhead. (line 19)
- After rendering the last item, selecting it works as expected and listcell now contains child component. Remember you should retrieve the listcell again after rendering because original listitem component is already detached replaced with new listitem. (line 21-24)
MultipleSelectAgent
The reason that ZATS Mimic provides a MultipleSelectAgent instead of combining it with SelectAgent is clearness. Because a user still can perform single selection in a listbox with attribute "multiple=true". If we only have one agent to select, it's hard to tell what kind of selecting a tester really want to do. Therefore we design 2 separate agents to reflect a tester's intention more precisely. With MultipleSelectAgent , you can select() and deselect() .
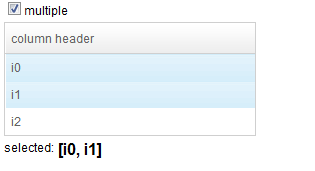
The application we use to demonstrate the usage contains a listbox with attribute "multiple=true" at first and there is a checkbox that can switch the listbox between single and multiple selection mode. When we select one or more items, the label at the bottom will display all selected item's label.
In the below test case, we perform 3 kinds of test: multiple select in multiple selection mode, single select in multiple selection mode, and multiple select in single selection mode.
MultipleSelectTest
	@Test
	public void testAgent() {
		DesktopAgent desktopAgent = Zats.newClient().connect("/multiple-select.zul");

		Label msg = desktopAgent.query("#msg").as(Label.class);
		Assert.assertEquals("", msg.getValue());

		ComponentAgent listbox = desktopAgent.query("#lb");
		Assert.assertEquals(4, listbox.as(Listbox.class).getChildren().size()); // include header
		List<ComponentAgent> items = listbox.queryAll("listitem");

		// listbox multiple selection
		items.get(0).as(MultipleSelectAgent.class).select();
		items.get(1).as(MultipleSelectAgent.class).select();
		items.get(2).as(MultipleSelectAgent.class).select();
		Assert.assertEquals("[i0, i1, i2]", msg.getValue());
		Assert.assertEquals(3, listbox.as(Listbox.class).getSelectedCount());

		items.get(1).as(MultipleSelectAgent.class).deselect();
		Assert.assertEquals("[i0, i2]", msg.getValue());
		Assert.assertEquals(2, listbox.as(Listbox.class).getSelectedCount());
		items.get(0).as(MultipleSelectAgent.class).deselect();
		Assert.assertEquals("[i2]", msg.getValue());
		Assert.assertEquals(1, listbox.as(Listbox.class).getSelectedCount());

		items.get(0).as(MultipleSelectAgent.class).deselect(); // should happen nothing
		Assert.assertEquals("[i2]", msg.getValue());
		Assert.assertEquals(1, listbox.as(Listbox.class).getSelectedCount());

		//single select in multiple selection mode
		String[] values = { "[i0]", "[i1]", "[i2]" };
		for (int i = 0; i < 3; ++i) {
			items.get(i).as(SelectAgent.class).select();
			Assert.assertEquals(values[i], msg.getValue());
		}

		//multiple select in single selection mode, throw an exception
		desktopAgent.query("#multipleMode").as(CheckAgent.class).check(false);
		try {
			items.get(0).as(MultipleSelectAgent.class).select();
			Assert.fail();
		}catch(RuntimeException e){
			System.out.println(e.getMessage());
		}
	}
- With MultipleSelectAgent , we can mimic multiple selecting behavior. (line 13, 19)
- Deselect a non-selected item won't cause any error. (line 26)
- Under multiple selection mode, you still can use SelectAgent to perform single selecting. (line 33)
- But if you want to do multiple selecting under single selecting mode, you'll get a run-time exception. (line 40)
OpenAgent
OpenAgent is used to expand a treeitem, listgroup, detail, bandbox, groupbox or combobutton.
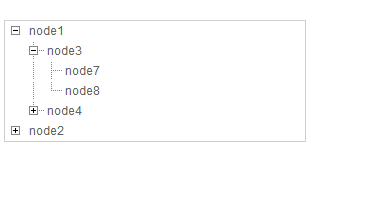
Here we use a tree with binary structure to demonstrate this agent's usage. Each 'treeitem has 2 children.
In below test case, we expand first treeitem (node1) and its first child treeitem (node3), then first treeitem's visible item count should be 5. Before expanding, its visible item count is 1(only itself).
OpenTest.java
	@Test
	public void testAgent() {
		DesktopAgent desktop = Zats.newClient().connect("/open-tree.zul");

		ComponentAgent firstItem = desktop.query("#tree").query("treeitem");
		Assert.assertEquals(1, firstItem.as(Treeitem.class).getVisibleItemCount());

		//open first item
		firstItem.as(OpenAgent.class).open(true);
		firstItem.query("treechildren").query("treeitem").as(OpenAgent.class).open(true);
		Assert.assertEquals(5, firstItem.as(Treeitem.class).getVisibleItemCount());

		//collapse first item
		firstItem.as(OpenAgent.class).open(false);
		Assert.assertEquals(1, firstItem.as(Treeitem.class).getVisibleItemCount());
	}
- Although there are 2 treeitem, query() only returns first one. (line 3)
- Before expanding, its visible item count is 1(only itself). (line 6)
- After we expand first treeitem and its first child item, its visible item count should be 5 now. You can tell it easily from the image above. (line 8-9)
- Call open(false) to collapse first treeitem, and its visible item count comes back to 1. (line 12)
CloseAgent
More Agent
There are more agents that are not covered here, please refer to [Project wiki]
Summary
Download
[? Example Project].
Comments
| Copyright © Potix Corporation. This article is licensed under GNU Free Documentation License. |
