Create and Run Your First ZK Application with Eclipse and ZK Studio
ZK Studio is an Eclipse plugin to simplify the development of ZK applications with Eclipse.
If you prefer to install it manually or use with other IDE, please refer to Create and Run Your First ZK Application Manually.
Prepare Eclipse
Install Eclipse
- Visit Eclipse download page and download Eclipse IDE for Java EE Developers
- Uncompress it to a proper directory
- Then, eclipse is ready to start for use.
For example, you could double-click eclipse.exe to start Eclipse under Windows.
Prerequisites
You can follow ZK Studio Installation Guide to install ZK Studio. There are prerequisites you have to set up before installing ZK Studio:
Java SE Development Kit (JDK)
Java SE Development Kit version 5 or 6 is required in order to run Eclipse, you can download either of them from the links below:
- JDK 6
- JDK 5
For detailed information on JDK installation, please see http://java.sun.com/javase/6/webnotes/install/index.html, or http://java.sun.com/j2se/1.5.0/install.html
Eclipse IDE for Java EE Developers
ZK Studio is an Eclipse Plug-in so you must install Eclipse in advance. The following Eclipse IDE for Java EE Developers packages are recommended:
- Eclipse v3.6 (Helios)
- Eclipse v3.5 (Galileo)
Please also see WTP Tutorials – Building and Running a Web Application for details.
Application Servers
Before developing web applications in Java with the ZK Ajax Framework, you need to install an application server. Apache Tomcat is one of the most popular Web containers. Tomcat versions 6 and 7 are compatible with ZK Studio and can be downloaded from the link http://tomcat.apache.org/.
Download the zip file of Tomcat distribution and extract it into a proper location (with no illegal characters or space in the pathname). Tomcat requires configuration before it works with Eclipse, please see ZK Studio Essentials for details.
Installing ZK Studio
Please follow the installation guide for your Eclipse version:
- Eclipse v3.6 (Helios)
- Eclipse 3.5 (Galileo)
- Eclipse 3.4 (Ganymede)
- Eclipse 3.3 (Europa)
Defining a Server Runtime
Before deploying and testing your application, you have to install a Web server (such as Tomcat) and specify the server in eclipse. For more information on installing a server, please also see ZK Installation Guide/Setting up Servers/Tomcat.
To specify the server in eclipse, please do as follows.
- From menu goto Windows > Preferences...
- Select Server > Runtime Environments, then click Add
- Select Apache > Apache Tomcat v6.0 and then click Next
- Browse to and select the root directory of the Web server installed in your computer
- For example, the root directory of Apache Tomcat might be
C:\Program Files\Apache Software Foundation\Tomcat 6.0 - For how to install Tomcat, please refer to this section
- For example, the root directory of Apache Tomcat might be
- Click Finish
Create a "Hello World" application from scratch with ZK Sutdio
Create a new "ZK Project"
With the release of ZK Studio you no longer have to create a new Dynamic Web Project and configure the settings for ZK! You can create a new ZK Project, choose your ZK Package and sit back while ZK Studio does the rest for you.
The following swf demonstrates how to create a new ZK project using Eclipse 3.4 and ZK Studio:
For detailed steps, please refer to Create a New ZK Project
Create a new ZUL file
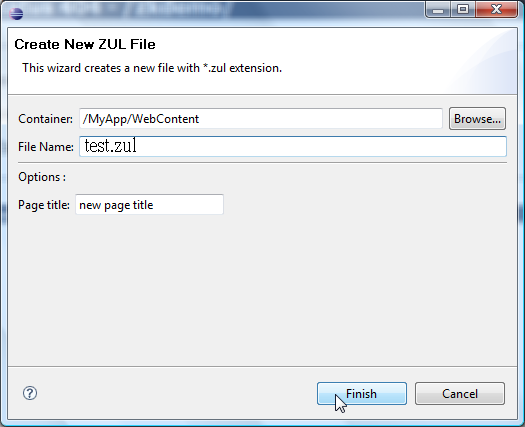
- 1. Right click on the WebContent folder in the Project Explorer view or the Package Explorer view and select New > ZUL.
- 2. Type test.zul in the File name textbox and click Finish.
- 3. The newly created ZUL File will be opened in the ZUL Editor.
Run the application
- 1. Right click on the MyApp project in explorer and in the Menu dialog select Run As > Run on Server
- 2. Select Apache > Tomcat v6.0 Server in the server type dialog and then click Finish
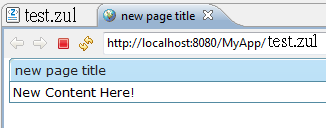
- 3. View the result in your browser.
Version History
| Version | Date | Content |
|---|---|---|


