Develop ZK application in OSGi Framework
Vincent Jian, Engineer, Potix Corporation
March 13, 2012
ZK 5
Introduction
OSGi-supported framework allows developers to develop appliactions in a modularized environment for ease of management and version control.
A few weeks ago Erko Knoll has shared an example on using ZK in OSGi environment. Now this small talk will demonstrate in detail how you can convert ZK jars into an OSGi bundle and how you can use this bundle to develop an OSGi-supported application.
If you are not familiar with OSGi it is recommended to read Erko's article[1] first before reading this small talk.
Convert ZK jars into an OSGi Bundle [2]
An OSGi Bundle is actually a jar file that contains MANIFEST.MS file under META-INF folder. The file describes the bundle with various attributes (Bundle-Name, Bundle-SymbolicName, Bundle-Version, Export-Package, Import-Package, and etc.) as the following example:
Manifest-Version: 1.0
Bundle-ManifestVersion: 2
Bundle-Name: OSGi Demo
Bundle-SymbolicName: osgi.demo;
Bundle-Version: 1.0
Bundle-RequiredExecutionEnvironment: J2SE-1.5
Require-Bundle: other-bundle-name;bundle-version="1.0"
Export-Package: business.service,
 model.pojo
Import-Package: javax.servlet;version="2.5.0",
 javax.servlet.http;version="2.5.0"
However, to manually prepare this file, especially adding Export-Package and Import-Package of ZK jars in MANIFEST.MS is a time consuming job. Here we would like to introduce two methods to convert ZK jars into one OSGi Bundle with the assist of Eclipse IDE. The first method is to use Eclipse Plug-in Project, and the second method is to use BND.
Eclipse Plug-in Project
Follow the steps to create a ZK OSGi bundle:
- Follow Eclipse Wizard to create a new Plug-in Project.
- File -> New -> Other -> Plug-in Project
- Type the project name (here I use zkee.osgi.bundle) and in Target Platform choose an OSGi framework as standard, press Next button.
- In Properties panel, type ID (zkee.osgi.bundle), Version (latest ZK release version, 5.0.10), Name (ZK EE OSGi Bundle) and Provider (leave blank) information, and the Execution Environment choose J2SE-1.5 for compatibility. In Options panel, unchecked Generate an activator since we do not need Activator here. Press Next button
- Unchecked Create a plug-in using one of the templates since we do not need it here. Press Finish button.
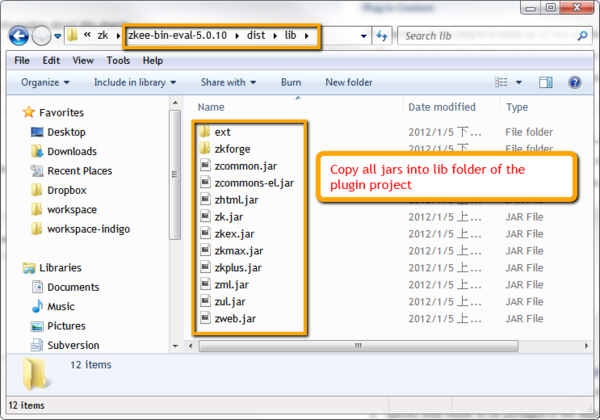
- Create lib folder under the project and copy all ZK EE jars (in this case we are using EE edition) in the lib folder. The jars under ext and zkforge folders should also be moved to the lib folder.
- Open MANIFEST.MF file to modify the OSGi Bundle attributes
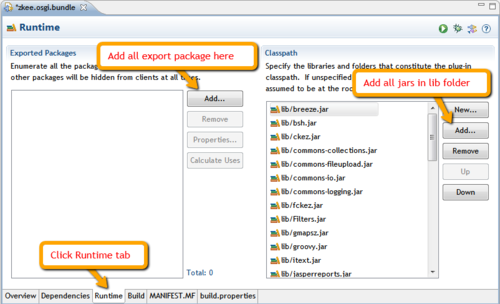
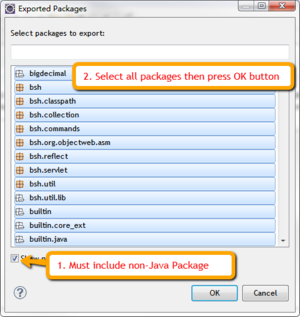
- Click Runtime tab. In Classpath panel, add all jars in lib folder. In Export Packages add all packages that zk jars provided, include non-java packages.
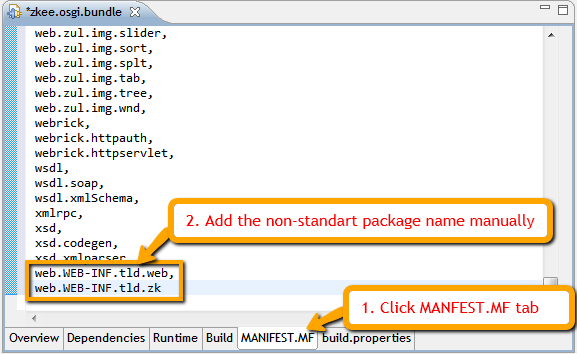
- The Export Packages will miss "web.WEB-INF.tld.web" and "web.WEB-INF.tld.zk" that have to added manually in MANIFEST.MF tab.
- Go back the Runtime tab, in Export Package panel, click Calculate Uses to analyze the package usage. This operation will take almost an half hour or more to finish ( you can remove the jars you don't need to speed it up).
- Click Dependencies tab. In Imported Packages panel, add necessary import package here. Depending on the OSGi container you are using, the required import packages may be different. Here are the minimum required packages:
- javax.servlet;version="2.5.0"
- javax.servlet.http;version="2.5.0"
- javax.swing.filechooser
- javax.xml.parsers
- javax.xml.transform
- javax.xml.transform.dom
- javax.xml.transform.stream
- org.w3c.dom
- org.xml.sax
- org.xml.sax.ext
- org.xml.sax.helpers
- Export the bundle in Overview tab by Export Wizard button located at bottom right, and the bundle is ready.
BND
Another option is to use BND. BND tool is developed by Peter Kriens that can help to create an OSGi bundle and convert existed JAR files into OSGi bundle easily. Here we will show how we can use the Eclipse plug-in BndTools to convert ZK jars into an OSGi bundle. The steps are as follows,
- Install BndTools plug-in
- Open Eclipse, Help -> Eclipse Marketplace -> Find "BndTools" -> Install
- Create Bnd project
- File -> New -> Other -> BndTools -> Wrap JAR as OSGi Bundle Project -> Add External
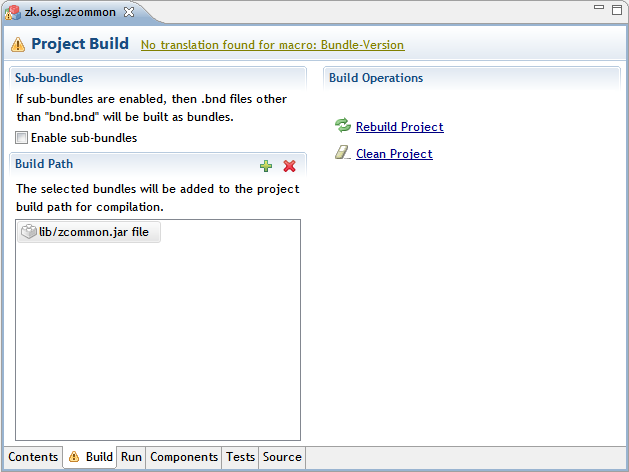
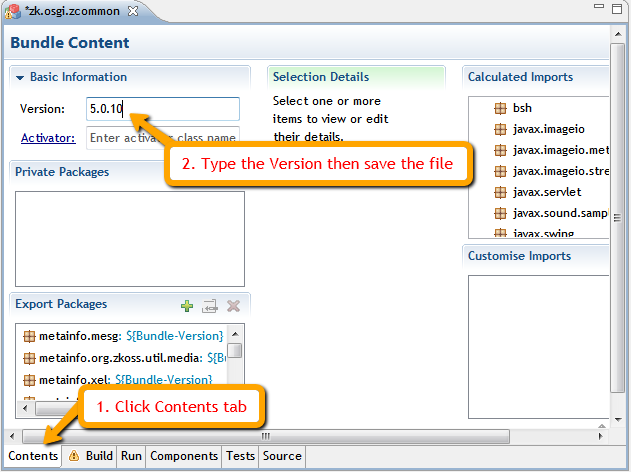
- Follow the wizard to type the Project Name and choose J2SE-1.5 for compatibility. After finishing the wizard, Eclipse will change the view to Bundle content as the following image.
- Click the Contents tab then type the Version info and save the changes.
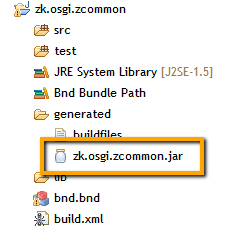
- Check the generated jar, and that is the OSGi bundle we want.
- Repeat step 2 for all ZK jars.
- Here you can copy all the generated jars into the repository of the OSGi container, or
- Wrap all the generated jars into one OSGi bundle by Eclipse Plug-in Project described above without the Calculate Uses step.Note: this option is recommended for ease of use.
With BndTools, we can convert ZK jars into OSGi bundle quickly, and it will prepare import packages automatically, where with Eclipse Plug-in Project we need to specify import packages by ourselves. However, one thing to note is that with BndTools we have to wrap ZK jar files one by one because the Export Packages are duplicate due to duplicated package name, such as metainfo.zk.
- ↑ Erko Knoll's article: Small_Talks/2011/December/ZK_OSGi_-_Developing_plug-in_based_applications_with_OSGi
- ↑ Since 6.0.2, ZK already provide OSGified jars that support OSGi, therefore you do not need to convert by your self.
Develop ZK Application
In the previous section, we have converted ZK jars into one OSGi bundle. Here we will show how we can use this bundle to develop an OSGi-supported ZK application - a modularized simple CRUD application.
Basic module design
Normally, we create an ZK application with MVC pattern where we will put the data access related classes in one package and the web view related classes in another. And in the case that we need a different web view with same back-end data set we will create another web project and copy the same data access code from the first project.
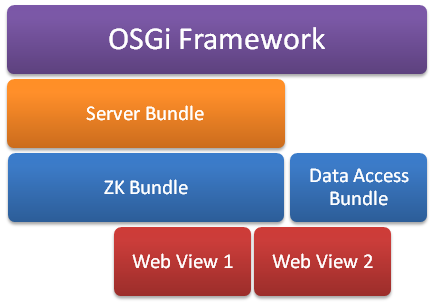
With OSGi's modular concept, we don't need to copy and paste as what we used to do. We can simply draw the data access code into a standalone OSGi bundle called Data Access Bundle, and both the two web view bundles can use this data access code by defining Require-Bundle in MANIFEST.MF. Here is an image that illustrates the concept:
Data Access Bundle
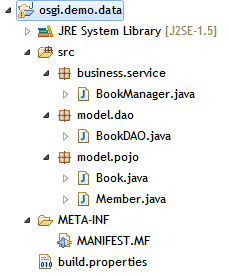
The data access bundle is a simple plug-in project that contains POJO beans, DAO classes and Service classes. Here are the steps to create data access bundle:
- Create Plug-in Project by Eclipse wizard, the project name here I use is osgi.demo.data.
- Create packages, and write related code
- Modify MANIFEST.MS file. Since only Manager class and POJO beans will be used in Web View, the requested Export-Package are business.service and model.pojo
- The final project structure:
- Export the project by Eclipse Deployable plug-ins and fragments wizard.
Manifest-Version: 1.0
Bundle-ManifestVersion: 2
Bundle-Name: Data Access Bundle
Bundle-SymbolicName: osgi.demo.data
Bundle-Version: 1.0.0
Bundle-RequiredExecutionEnvironment: J2SE-1.5
Export-Package: business.service,
 model.pojo
Web View Bundle
The web view bundle is also a plug-in project that requires ZK OSGi bundle generated before and the data access bundle to present data. Here are the steps to create web view bundle project:
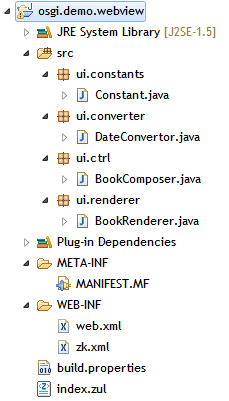
- Create Plug-in Project by Eclipse wizard, the project name here I use is osgi.demo.webview.
- Create WEB-INF folder under project root that contains web.xml and zk.xml as usual.
- Create index.zul under project root and write necessary Composer class
- Modify MANIFEST.MF file as follow. In line 7 and 8, we define required bundle based on the ZK components and POJO bean required for presenting data. Please notice line 9, with the Web-ContextPath[1] attribute defined here, the OSGi container will recognize that this bundle will run as a web application. And the web url will be http://localhost:port/osgidemo
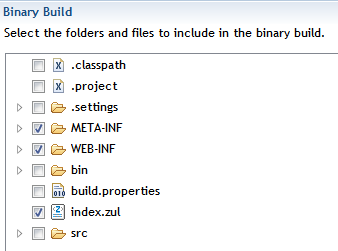
- Modify build.properties file as follow. The WEB-INF folder, zul files and any other folder you created must be checked here.
- The final project structure:
- Export the project by Eclipse Deployable plug-ins and fragments wizard.
Manifest-Version: 1.0
Bundle-ManifestVersion: 2
Bundle-Name: Web View Bundle
Bundle-SymbolicName: osgi.demo.webview;singleton:=true
Bundle-Version: 1.0.0
Bundle-RequiredExecutionEnvironment: J2SE-1.5
Require-Bundle: zkee-osgi;bundle-version="5.0.10",
 osgi.demo.data;bundle-version="1.0.0"
Web-ContextPath: /osgidemo
Webapp-Context: /osgidemo
Deploy to OSGi Container
In the previous section, we have modularized the project into two bundles. Here we will deploy these bundles in OSGi container and this is the last step. There are many OSGi containers available out there, and I have tried with the following three containers, Eclipse Equinox, Apache ServiceMix, and EclipseRT Virgo.
Eclipse Equinox
Eclipse Equinox[2] is an implementation of the OSGi R4 core framework specification, a set of bundles that implement various optional OSGi services and other infrastructure for running OSGi-based systems.
Steps to deploy the project
There is no need to deploy or to export the project with Eclipse Equinox, you can see the result instantly during development phase by EclipseRTWebStarterKit. Here are the steps that demonstrate how to use EclipseRTWebStarterKit in Eclipse IDE.
- Download EclipseRTWebStarterKit ready-to-run server package here and unzip the file.
- Import EclipseRTWebStarterKit to Eclipse workspace.
- File -> Import -> General -> Existing Projects into Workspace
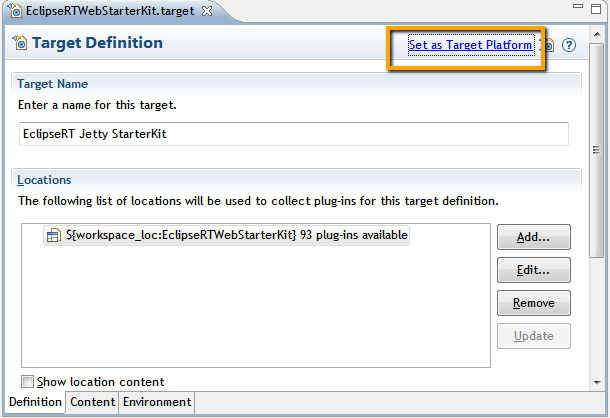
- Open EclipseRTWebStartkerKit.target under project root, then click Set as Target Platform link.
- Right click the osgi.demo.webview project -> Run -> Run Configuration... -> OSGi Framework
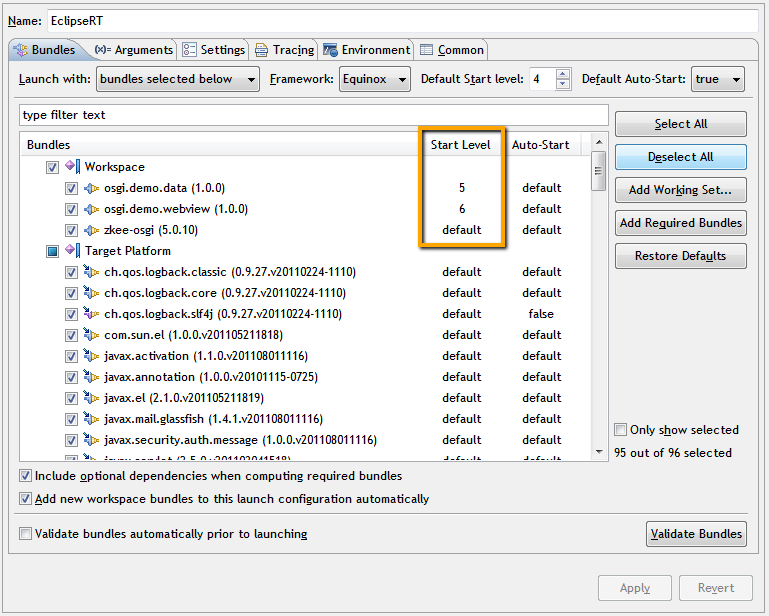
- In order to make sure the bundle start sequence, set the start level in Bundles tab.
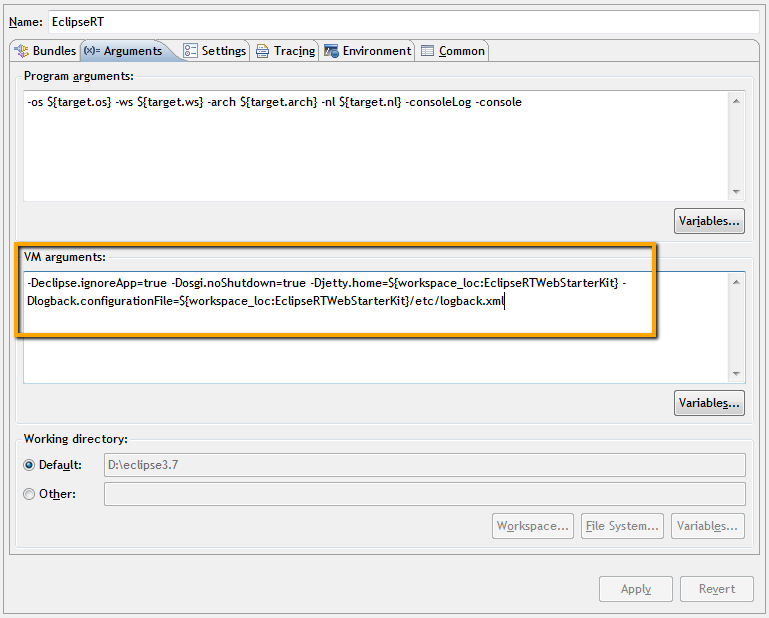
- Add additional VM arguments In the (x)= Arguments tab.
- Click Run button
- In the Eclipse Console it will show osgi console. You can Type "help" command to show the command list and usage.
- In the osgi console type "ss" command, if you see all bundle is INSTALLED status. Close the console and then re-run OSGi framework again.
- Visit http://localhost:8080/osgidemo/index.zul to see the result.
- You can keep changing the code without terminating OSGi framework, just type "restart BundleID" in osgi console to see the changes.
Apache ServiceMix
Apache ServiceMix[3] is a flexible, open-source integration container that unifies the features and functionality of Apache ActiveMQ, Camel, CXF, ODE, Karaf into a powerful runtime platform you can use to build your own integrations solutions. It provides a complete, enterprise ready ESB (enterprise service bus) exclusively powered by OSGi.
Steps to deploy the project
- Download Apache ServiceMix from http://servicemix.apache.org/ and unzip the file to "C:\apache-servicemix-4.4.0".
- Copy the three bundles (zkee-osgi_5.0.10.jar, osgi.demo.data_1.0.0.jar and osgi.demo.webview_1.0.0.jar) into "C:\apache-servicemix-4.4.0\deploy"
- Execute "C:\apache-servicemix-4.4.0\bin\servicemix.bat" file in command line.
- Visit http://localhost:8181/osgidemo/index.zul to see the result.
- Note: if you cannot see the correct result, it might be caused by the wrong bundle installation sequence. You can try to use the following command to fix the problem.
- Find the webview bundle ID:
- Restart the bundle:
web:list
osgi:restart BundleID
EclipseRT Virgo
The Virgo Web Server from EclipseRT is a completely module-based Java application server that is designed to run enterprise Java applications and Spring-powered applications with a high degree of flexibility and reliability. It offers a simple yet comprehensive platform to develop, deploy, and service enterprise Java applications.[4]
Steps to deploy the project
- Download EclipseRT Virgo from http://eclipse.org/virgo/download/.
- Follow the user guide to install and start the server.
- Open the Web Admin Console via http://localhost:8080/admin with default account/password(admin/springsource)
- Follow the bundle installation guide here
- Deploy the three bundles one by one with the following sequence.
- zkee-osgi_5.0.10.jar
- osgi.demo.data_1.0.0.jar
- osgi.demo.webview_1.0.0.jar
- Visit http://localhost:8080/osgidemo/index.zul to see the result.
Conclusion
The OSGi standard provides powerful modularization and version control which I think is very convenient for developers to control the bundle versions with various functions, and can help developers to design the skeleton of the project with loose coupling. Also it reduces the time for restarting the server during development phase. Following this article you should be able to convert ZK jar files into OSGi bundles and start your first OSGi-supported application.
Download
Download the sample bundles:
Reference
- ↑ Some OSGi containers will read Webapp-Context attribute instead of reading standard Web-ContextPath attribute so here we define both attributes for compatibility.
- ↑ Eclipse Equinox: http://eclipse.org/equinox/ Eclipse
- ↑ Apache ServiceMix: http://servicemix.apache.org/
- ↑ EclipseRT Virgo: http://eclipse.org/virgo/
Comments
| Copyright © Potix Corporation. This article is licensed under GNU Free Documentation License. |
