Template:Tutorial common chapters
Warm Up
In this chapter, we'll guide you how to prepare an environment to build a web application with ZK including setting IDE, installing ZK, and running an application in a server.
Setup Eclipse
We use Eclipse IDE 3.7 (indigo) for Java EE developer ![]() to demonstrate the whole instructions. (Download Eclipse, extract the downloaded zip file to a folder and execute eclipse.exe to open Eclipse.)
to demonstrate the whole instructions. (Download Eclipse, extract the downloaded zip file to a folder and execute eclipse.exe to open Eclipse.)
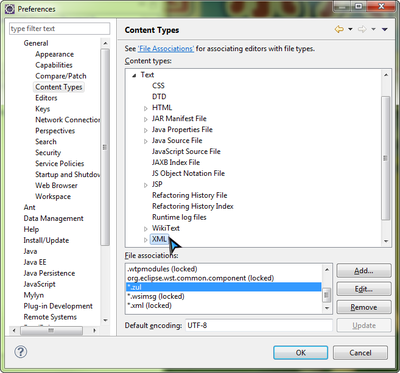
In order to edit ZK UI page in Eclipse, you should add "zul" (It's ZK UI page's file extension name) as a content type of XML format in following steps:
- Select Window \ Preferences to open Preferences window
- In left tree, select General \ Content Types, on right hand side, expand Text node in "Content types" box, select XML
- Click Add button, type *.zul, and click OK button
After this setup, Eclipse will use XML editor to open it when you double click a zul file.
Install ZK in a Web Project
Download ZK
Download the ZK CE first (file name looks like zk-bin-[version].zip) and extract it to a folder.
Create a Project
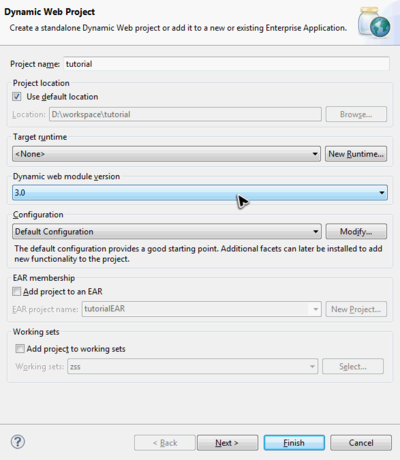
To build a web application, you should create a "Dynamic Web Project" in Eclipse first:
- Select File \ New \ Dynamic Web Project
- Enter warmup in Project name and keep every thing else default.
- You can leave "Target runtime" as "none".
- Notice that we set Dynamic web module version to 3.0 because we want to use Servlet 3.0 to eliminate application configuration.
Install ZK JAR
To use ZK in your project, you have to copy ZK JAR into your project's library folder.
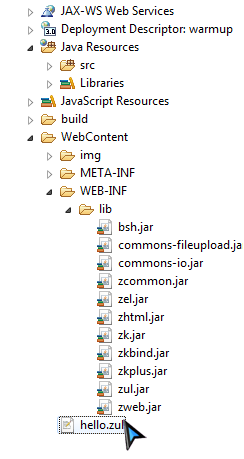
Copy JAR files under following list to WebContent\WEB-INF\lib:
- {YOUR_ZK_UNZIP_FOLDER}\dist\lib
- {YOUR_ZK_UNZIP_FOLDER}\dist\lib\ext
If you prefer to use an application server that supports older (< 3.0) Servlet specification or JDK 1.5, you need more configuration on web.xml. Please refer to ZK Installation Guide. [1]
Create a Simple Page
After installation, you can create a simple zul to verify the installation works or not. In Eclipse,
- Select File \ New \ File (or File \ New \ Other \ File ) to add a new file, hello.zul, under WebContent.
- Click Source tab to modify source.
- Copy and paste the following sample code into hello.zul and save it.
hello.zul
 <window title="My First ZK Application" border="normal">
 	Hello World!
 </window>
After above steps, in Project Explorer view your project may look like:
If you don't find Project Explorer view, select menu Window \ Show View \ Project Explorer to open it.
Run an Application
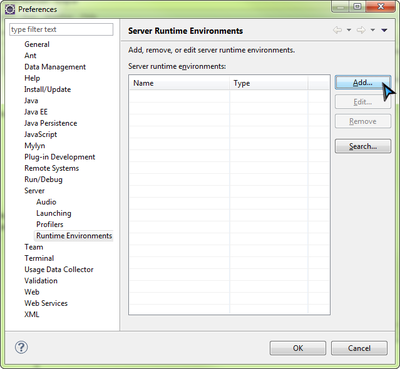
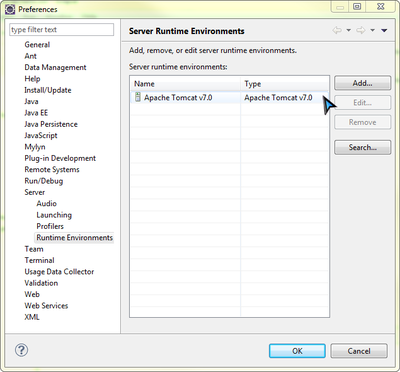
Before running a web application, we must create a server in Eclipse. Select Window \ Preferences to open Preferences window and select Server \ Runtime Environments from left tree. Click Add button to add a server runtime environment.
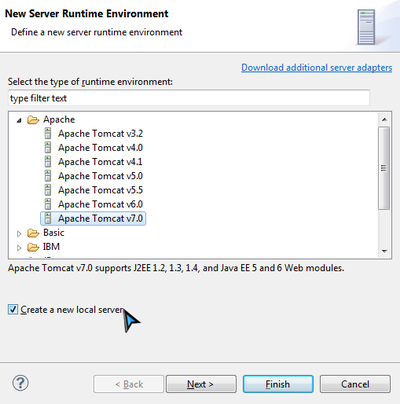
Select Apache \ Tomcat v7.0 Server because it supports Servlet 3.0 and check Create a new local server. Then click Next button.
If you use JDK 1.5, you could choose Tomcat v6.0. But you need more configuration on web.xml. Please refer to ZK Installation Guide in References .
If you had installed Tomcat 7 before, just provide your path. If you don't, proceed the following step:
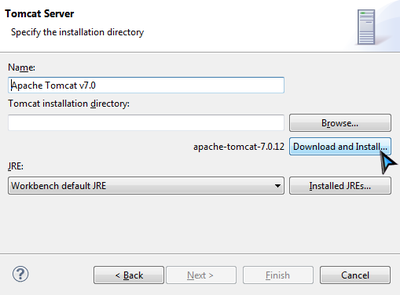
- Click Download and Install button and choose a folder.
- Notice that the installation path must not contain non-ASCII character.
- Accept the license agreement, wait for a minute.
- Please wait Eclipse to complete the installation and do not interrupt it to ensure correct installation.
- Eclipse will download and install Tomcat into the folder you specified. After installation is complete, the Finish button will become enabled.
- Click Finish button to complete it.
After above steps, you can see a new entry in Server rumtime environments.
Right click on hello.zul, in context menu, select Run As \ Run on Server to run this zul on an application server.
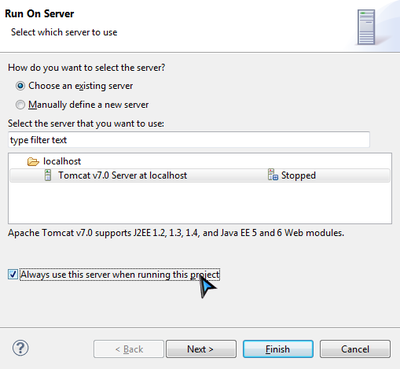
Choose an existing Tomcat 7. Yon can also check Always use this server when running this project option to avoid choosing a server each time you run the application in the future. Click Finish button and wait for the server starts running.
After the server starts running successfully, Eclipse opens a browser automatically and connects to http://localhost:8080/hello.zul. If you can see the following image, then your project is ready to use ZK.
You can follow above steps to run your application during this tutorial.
Import and Run Example Application
Download example application project zip file first.
In Eclipse, select File \ Import \ General \ Existing Projects into Workspace, choose Select archive file to import example application zip file as a project to your Eclipse. Then follow the instructions in Run an Application to run it.
Example Application
Use Case
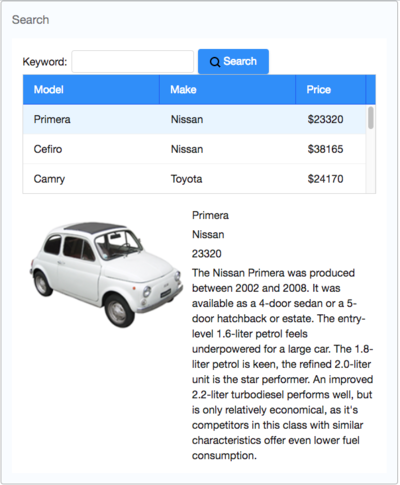
Our target application is a simple car catalog application. This application has 2 functions:
- Search cars.
- Enter a keyword in the input field, click search button and it displays the search result in the car list below.
- View details.
- Click an item of the car list, then the area below the car list shows the selected car's details including name, price, description, and preview.
Domain Class
The following is the domain object that represents a car.
public class Car {
	private Integer id;
	private String name;
	private String company;
	private String preview;
	private String description;
	private Integer price;
	//omit getter and setter for brevity
}
- Please refer to References section to see the complete code. [2]
Then we define a service class to perform the business logic (search cars) as follows:
public interface CarService {

	/**
	 * Retrieve all cars in the catalog.
	 * @return all cars
	 */
	public List<Car> findAll();

	/**
	 * search cars according to keyword in name and company.
	 * @param keyword for search
	 * @return list of car that match the keyword
	 */
	public List<Car> search(String keyword);
}
We have a CarServeImpl that implements above interface. For simplicity it uses a static list object as the data model. You can replace it with connecting to a database in a real application. The implementation detail is not in this article's scope, please refer to References section.[3]
